
RPi で回線遅延シュミレーター
目次
[table_contents]
RPi をWifi のAPにして、回線遅延シュミレーターを作る
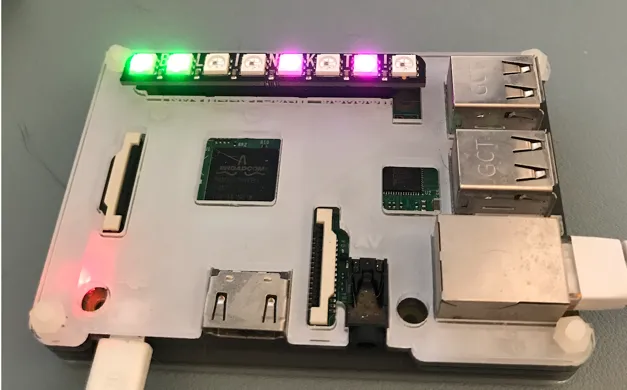
完成図
- RPi WLAN: 192.168.100.1
- WLAN 192.168.100.2以上をDHCPで付与
- RPi 有線をinertnet 接続
- 遅延は有線側のキューで行う
- SSID は、
rpilss
RPi をsetup
RPi のイメージをダウンロードしてsetupする。
https://www.raspberrypi.org/downloads/raspberry-pi-os/
html
Raspberry Pi OS (32-bit) Lite
Minimal image based on Debian Buster
Version:August 2020
Release date:2020-08-20
Kernel version:5.4
Size: 435 MB
RPiに有線LANのアダプタを接続
RPi の有線は、internet接続できるように設定する。
この時点で、 ifconfig を格にするとこんな感じ
bash
$ ifconfig
eth0: flags=4163<UP,BROADCAST,RUNNING,MULTICAST>  mtu 1500
        inet xxx.xxx.xxx.xxx  netmask 255.255.255.0  broadcast xxx.xxx.xxx.xxx
        inet6 fe80::xxxx:e22:6489:c81  prefixlen 64  scopeid 0x20<link>
        ether xx:27:eb:xx:37:38  txqueuelen 1000  (Ethernet)
        RX packets 3059  bytes 323839 (316.2 KiB)
        RX errors 0  dropped 0  overruns 0  frame 0
        TX packets 137  bytes 20089 (19.6 KiB)
        TX errors 0  dropped 0 overruns 0  carrier 0  collisions 0

lo: flags=73<UP,LOOPBACK,RUNNING>  mtu 65536
        inet 127.0.0.1  netmask 255.0.0.0
        inet6 ::1  prefixlen 128  scopeid 0x10<host>
        loop  txqueuelen 1000  (Local Loopback)
        RX packets 0  bytes 0 (0.0 B)
        RX errors 0  dropped 0  overruns 0  frame 0
        TX packets 0  bytes 0 (0.0 B)
        TX errors 0  dropped 0 overruns 0  carrier 0  collisions 0
firmware も最新にしておく
bash
$ sudo rpi-update
$ sudo reboot
WiFiのsetup
APとする予定のWiFiをsetupする。
/etc/network/interfaces.d/wlan0 に、WiFiの固定IPを設定
bash
$ sudo vi /etc/network/interfaces.d/wlan0
---
iface wlan0 inet static
    address 192.168.100.1
    netmask 255.255.255.0
WiFi用DHCPサーバ設定
/etc/dhcpcd.conf の最後に以下を追加
text
# for WLAN client
interface wlan0
static ip_address=192.168.100.1/24
bash
sudo systemctl restart dhcpcdWiFi AP セットアップ
WiFi AP のソフト hostapd をinstallする。
bash
$ sudo apt-get update -y
sudo apt install hostapd -y
bash
sudo vi /etc/hostapd/hostapd.conf
---
interface=wlan0
driver=nl80211
hw_mode=b
channel=1
macaddr_acl=0
auth_algs=1
ignore_broadcast_ssid=0
ieee80211ac=0
wmm_enabled=1
ieee80211d=1
country_code=JP
ieee80211h=1
local_pwr_constraint=3
spectrum_mgmt_required=1
wpa=2
wpa_key_mgmt=WPA-PSK
ssid=SSID名
wpa_passphrase=パスワード
bash
sudo vi /etc/default/hostapd
---
DAEMON_CONF="/etc/hostapd/hostapd.conf"
ssid と wpa_passphrase は自分の都合で設定
WiFiの設定が終わったので再起動。
bash
$ sudo systemctl unmask hostapd
$ sudo systemctl enable hostapd
$ sudo systemctl start hostapd
NATの設定
port forward
WLANからinしたpacketを有線にoutするための設定。
net.ipv4.ip_forward=1 のコメント # を外して、有効化する。
bash
$ sudo vi /etc/sysctl.conf
---
# Uncomment the next line to enable packet forwarding for IPv4
net.ipv4.ip_forward=1
masqurade
無線LANの 192.168.100.0/24 のパケットを有線LANのIPとしてOUTする。
dnsmasq をinstall
bash
$ sudo apt install dnsmasq -ybash
$ sudo vi /etc/dnsmasq.conf
---
interface=wlan0
dhcp-range=192.168.100.2,192.168.100.100,255.255.255.0,24h
firwall のsetup
bash
iptables -t nat -A POSTROUTING -o eth0 -j MASQUERADE
sh -c "iptables-save > /etc/iptables.ipv4.nat"
bash
$ sudo vi /etc/rc.local
---
iptables-restore < /etc/iptables.ipv4.nat
exit 0
確認
reboot
bash
$ sudo rebootreboot 後、確認。 wlan0 が 192.168.100.1 で設定OK。
bash
$ ifconfig
---
wlan0: flags=4163<UP,BROADCAST,RUNNING,MULTICAST>  mtu 1500
        inet 192.168.100.1  netmask 255.255.255.0  broadcast 192.168.100.255
        inet6 fe80::e1ad:xxxx:d6f6:xxxx  prefixlen 64  scopeid 0x20<link>
        ether b8:cc:eb:xx:62:xx  txqueuelen 1000  (Ethernet)
        RX packets 0  bytes 0 (0.0 B)
        RX errors 0  dropped 0  overruns 0  frame 0
        TX packets 24  bytes 3546 (3.4 KiB)
        TX errors 0  dropped 0 overruns 0  carrier 0  collisions 0
setupが終わったら、iPhoneから接続確認。
WiFiアクセスポイントとしての状態を systemctl コマンドで確認する。
bash
$ sudo systemctl status hostapd
● hostapd.service - Advanced IEEE 802.11 AP and IEEE 802.1X/WPA/WPA2/EAP Authenticator
   Loaded: loaded (/lib/systemd/system/hostapd.service; enabled; vendor preset: enabled)
   Active: active (running) since Sat 2020-09-19 05:31:48 BST; 34s ago
  Process: 722 ExecStart=/usr/sbin/hostapd -B -P /run/hostapd.pid -B $DAEMON_OPTS ${DAEMON_CONF} (code=exited, sta
 Main PID: 724 (hostapd)
    Tasks: 1 (limit: 2063)
   CGroup: /system.slice/hostapd.service
           └─724 /usr/sbin/hostapd -B -P /run/hostapd.pid -B /etc/hostapd/hostapd.conf

Sep 19 05:31:48 rpilss hostapd[722]: Configuration file: /etc/hostapd/hostapd.conf
Sep 19 05:31:48 rpilss hostapd[722]: wlan0: interface state UNINITIALIZED->COUNTRY_UPDATE
Sep 19 05:31:48 rpilss hostapd[722]: wlan0: Could not connect to kernel driver
Sep 19 05:31:48 rpilss hostapd[722]: Using interface wlan0 with hwaddr b8:27:eb:xx:xx:xx and ssid "rpilss"
Sep 19 05:31:48 rpilss hostapd[722]: wlan0: interface state COUNTRY_UPDATE->ENABLED
Sep 19 05:31:48 rpilss hostapd[722]: wlan0: AP-ENABLED
Sep 19 05:31:48 rpilss systemd[1]: Started Advanced IEEE 802.11 AP and IEEE 802.1X/WPA/WPA2/EAP Authenticator.
Sep 19 05:32:00 rpilss hostapd[724]: wlan0: STA dc:0c:5c:xx:d9:xx IEEE 802.11: associated
Sep 19 05:32:00 rpilss hostapd[724]: wlan0: STA dc:0c:5c:xx:d9:xx RADIUS: starting accounting session 1757A35CF91C
Sep 19 05:32:00 rpilss hostapd[724]: wlan0: STA dc:0c:xx:79:d9:xx WPA: pairwise key handshake completed (RSN)
遅延の設定
準備ができたの、tc コマンドで、遅延設定をためす。
RPi 上
初期化
bash
$ sudo tc qdisc del dev eth0 rootping で性能をテスト
bash
$ ping -c 3 8.8.8.8
PING 8.8.8.8 (8.8.8.8) 56(84) bytes of data.
64 bytes from 8.8.8.8: icmp_seq=1 ttl=114 time=7.65 ms
64 bytes from 8.8.8.8: icmp_seq=2 ttl=114 time=7.23 ms
64 bytes from 8.8.8.8: icmp_seq=3 ttl=114 time=7.25 ms
500msec 遅延
bash
$ sudo tc qdisc del dev eth0 root
$ sudo tc qdisc add dev eth0 root netem delay 500ms
ping でテスト
bash
$ ping -c 3 8.8.8.8
PING 8.8.8.8 (8.8.8.8) 56(84) bytes of data.
64 bytes from 8.8.8.8: icmp_seq=1 ttl=114 time=507 ms
64 bytes from 8.8.8.8: icmp_seq=2 ttl=114 time=507 ms
64 bytes from 8.8.8.8: icmp_seq=3 ttl=114 time=507 ms
RPi のWiFi接続したMac
遅延なし
bash
$ ping -c 3 8.8.8.8
PING 8.8.8.8 (8.8.8.8): 56 data bytes
64 bytes from 8.8.8.8: icmp_seq=0 ttl=113 time=29.916 ms
64 bytes from 8.8.8.8: icmp_seq=1 ttl=113 time=19.460 ms
64 bytes from 8.8.8.8: icmp_seq=2 ttl=113 time=12.443 ms
500msec 遅延
bash
$ ping -c 3 8.8.8.8
PING 8.8.8.8 (8.8.8.8): 56 data bytes
64 bytes from 8.8.8.8: icmp_seq=0 ttl=113 time=588.576 ms
64 bytes from 8.8.8.8: icmp_seq=1 ttl=113 time=516.176 ms
64 bytes from 8.8.8.8: icmp_seq=2 ttl=113 time=615.066 ms